Showing posts with label Paper Mixing Bowl. Show all posts

Sunday, February 17, 2013

The Apple of My Eye

Hello,

I have what I love to call a "super cool" layout to share that was submitted at The Paper Mixing Bowl for their February challenge.

Before I get to my creation, I have wonderful news!  
I was asked to be a GUEST DESIGNER for February at The Paper Mixing Bowl!!
And of course I accepted, I was so thrilled to even be asked!  It was so exciting to create my layout with that in mind.  Woo hoo!!

Ok, so here's the Recipe Challenge - Red Velvet Cake

 
 Since it's a bit hard to see, here's the recipe info.

Use all colors shown (Red Velvet, Rich Cream, Steeped Tea)

Utensils (Use at least two)
It's a Layer Cake!
Frosting (i.e. molding, paste, flock, etc.)
Two is Better than One (i.e. Pairs)
You've Got Mail (i.e. Postage related items)
Spill Something (i.e. tea rings, coffee stains, etc.)
Hearts and Flowers
Multi-Photo (i.e. More than two)

Directions (Optional Journaling)
1.  Journaling Prompts: Two, Love, Rose
2.  Journaling Elements: Use a definition, Write a Love Letter, Use a Children's Valentine card, Quote a Poem

Here's what was posted on their site (all smiles):

 Guest Designer - Libby - "The Apple of My Eye"


 And now for a little story about my page.
This is our boy when he was just a tot!  He sure was (and still is) a "ham" for the camera... no matter what he was doing or even when he just woke up from a nap (at least most times anyway).  He was so full of energy and was literally climbing the walls every day after we got home from the babysitters.  When I say literally, I mean literally.  He would place his hands and feet on each side of a doorway and "climb" to the top.  It's a good thing the doorway was only so high, because he would just keep on going!  Sometimes he would do this too... he would start in the kitchen and run into the living room at full speed and jump up against the back of the couch (with his feet) tilting it up off the floor!  I still can't figure out how he did that.  He was a quick one!  Yup, he had more energy than I did!!   :)

Here's the recipe I chose:
The obvious... Color Palette and Sketch

Utensils:
Layers
Two Hearts
4 Photos
Spill Something
Postage related items

Directions:
Use a Definition
 
Supplies used:
Paper: Debbie Mumm, Hot Off the Press, Other
Distressing
Mister Huey's Color Mists: Real Red
Distress Stain: Tim Holtz
Twill
Twine
Heart Stickers: JoAnn Craft
Postage Stickers
Definition Bubble Sticker: JoAnn Craft
Sticker Title: K&Co.

The definition sticker was matted on a piece of paper that was scrunched, distressed and inked.

The stickers were all adhered onto paper, trimmed around and the edges distressed.

The background paper was scrunched and lightly inked.

 I added stamp sticker and various cardstock items.  I also added a bookmark.  The cotton twill was inked to have a more distressed look and twine was knotted around the loop made at the top.

I make my own little book... and had so much fun in the process!  I stapled several papers together and added the red paper as the book cover.  Then I got to work distressing and inking the top pages.  The other pages were also distressed and scrunched a bit to make the pages look "worn."  I folded down the the corner of the page to "mark it."  The ink was sprayed several times, then I tipped it up and it ran.
Only the center of each page was adhered so they would look loose like a real book.


Here's a closer look at the upper right of my "book."  After turning down the corner I inked around it.  The sticker title was one solid strip, which wouldn't fit the way I wanted it to on my page, so I cut it, adhered it onto paper and distressed the edges.
 
Here's the ink spritz and drips.

The bookmark was cut at the bottom and the edges rubbed to distress them.

Here's the left side of my cute little book.  Love how the pages separate and curl up a bit.

Here's the right side of my page, showing a great look at the book.


Thanks for stopping by!

Wednesday, January 30, 2013

Giggly Girls

Hi there,

Today's layout was submitted at The Paper Mixing Bowl for their January 2013 Recipe Challenge.  All entries are due by February 14th.  This is the recipe:


 This is what I created:
These photos are of our cute little nieces.  We went into the Hobby Lobby store for the umpteenth time the two weeks we visited my sister.  I brought my camera every time we went anywhere.  When we walked into the store this particular time the girls decided to have some fun in the floral department.  There was never a dull moment with these two giggly girls!

I used the color palette and sketch.
For the "Utensils" I used wet medium, bling and metallic rub ons.

Supplies used:
Paper: Colorbok
Black Felt & Silver Stickers: Forever in Time
Fonts:  Cricut Opposites Attract & Stamped
Swirls traced from template
Silver Beads
Silver Cording
Gems
Color Mists: Wilton
Folk Art Paint - Black
Folk Art Extreme Glitter Paint - Silver
Mister Huey's Color Mists - Dewey
Metallic Rub ons - Silver


The black felt and silver stickers were tucked under the photos.  Gems were added randomly... actually by just dropping the gems onto the page and adhering them where they landed.
I used a silver metallic rub on around the edges of the background cardstock and in a few places on the layout... which you really can't see in any of my photos.  If you look at the full layout photo, you can see a little "smudge" above the heart and in the upper left corner of my page.
 
The background cardstock was misted with several mists and splattered using a toothbrush.  First I mixed water with the glitter paint, then I mixed black paint into it for a new affect.  Love how it turned out.
 

I used two Cricut fonts for the title.
 
Here's a closer look at the stickers, background misting and gems.

The two swirls were traced from a template, hand cut and the edges distressed.  Then they were placed into a heart.  Isn't it cute?
I tied the strings of the banner onto the heart.
 
 Here's a look at the left side of my page.
 
 
 I gathered several strands of silver string to thread the beads onto.  The beads are adhered so they will stay in place.


Here's the right side of my page.

Thanks for stopping by.
Hope you will stop in again!

Monday, December 24, 2012

Love U

Hi there,
Very quiet at our house today.... and I'm ok with that.  I had fun scrapping a few layouts.

Here is my layout which was submitted at the Paper Mixing Bowl for their Recipe Challenge.  Here's the recipe card:


This is what I created.
I used all 3 paper colors, bows, bauble, snowflakes, gift tags and journaling.
Here's our grandson, eating a popsicle on a cold winter's day.  I have no idea why he wanted to eat a popsicle, but it made him happy... and that's fine by me!

Supplies used:
Paper: DCWV, Colorbok, Other
Clear Plastic Snowflakes with Stickles
Ribbons
Ornament Tags
Glitter Chipboard Shapes
Tags
Jewel Stickers: Hot Off the Press
Snowflake Brads
Tiny Clothespins
Gold Letters
Foam Glitter Stocking
Clear Gems/Colorful Gems
Large Clear Snowflake with Bauble
Sharpie Markker
Red Cording
Ink: A la mode Red

 
 Gems were added to the centers of these colorful snowflakes to "jazz" them up a bit.
 
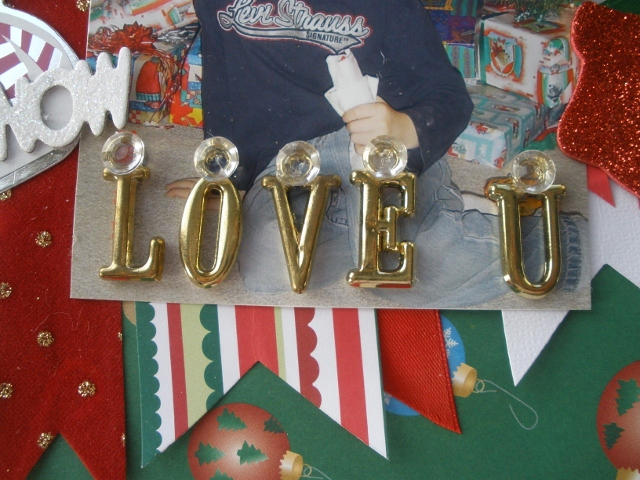
These letters had loops to hang them, but rather than do that, I simply added clear gems in the centers, which covered the loops and added the bling that I so love!

 
The rest of the photos are giving you a better look at everything going on on my page.
On the far left of the page, the gold snowflakes have jewel stickers in their centers.  Stickles covered the clear plastic snowflake on the ornament tag.  The snowman tag has a glittery chipboard word adhered on him.
 
On the far right of the page, I have a glitter tag with a snowflake and tree tag on it.  I added a bow and jewel stickers.  You can also get a glimpse of the red cording I used to hold everything.  A mini clothespin holds the tag to the cording.
 
 A large clear plastic snowflake was added with a cute bauble in the center.  Another ornament tag was added with ribbon, a tag with journaling and a cute little glitter foam stocking.
 
Another view of the dimension on the left side of the page.
 
And the dimension on the right side.

Love this snowflake!
 
A few more photos...


Have a wonderful Christmas holiday!
Libby  :)