Sunday, March 31, 2013

Sketches 4 All Spring Blog Hop & Scrap-a-Thon - Blog Candy Winner

The winner of my Blog Candy Giveaway is

Brandi Matos

Congrats, Brandi!  Please contact me with a PM and I'll get your prize mailed out.


Hello everyone!

Welcome to the Sketches 4 All Spring Blog Hop & Scrap-a-Thon!  The Blog Hop starts 
Monday, April 1st and will run until Sunday, April 7, 2013.
https://blogger.googleusercontent.com/img/b/R29vZ2xl/AVvXsEgzXi8CEpQxWuW6goM-6rRqIYayutYZ309Ze2blX_FQ32vgyrVp4mAhmZ9RwE57d5cw6Ku8zNOKnDA9d54pvR5OCsDWzk8X_JHx3Npk8x0FU597CdDHShyphenhyphen88wHjlBQEOY5Oe6SJuIf2CcsN/s1600/1-bloghop_edited-004.jpg

You should have arrived here from Jessica's wonderful blog.  If you would like to get back to the beginning of the Hop, just click here

I'm thrilled to announce that I am one of the NEW Design Team Members at Sketches 4 All, as of April 1st (and NO, this is not an April Fool's joke!!!)  I'm looking forward to being a part of this wonderful team.  In addition, I will also be hosting a monthly challenge and you won't was to miss out on a different challenge each month.

Hey!  Spring is in the air!  Let's have some fun blog hopping!  Don't you love the smell of fresh air and the smell of mud (yes, mud)... the wonderful signs of Spring.  And, if you live in an area that gets snow, like I do, the first sign of Spring is the melting snow!  Everyone is anxious to get outside and enjoy warmer weather and some sun.  Lots of people get busy with Spring cleaning.  You might even tackle your scrapping room/area and find some cool stuff that's been hidden for a while... and you could possibly use them on projects for the Sketches 4 All Scrap-a-Thon.

There will be lots of inspiration, challenges and prizes too!  Who doesn't love prizes, right?

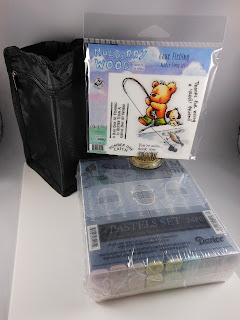
There will also be a Grand Prize offered and that person will be crowned "Queen of the Hop" and here's the fabulous prize:
https://blogger.googleusercontent.com/img/b/R29vZ2xl/AVvXsEguyjxn3r-s8j3d97u3CaFPf8BbAYzaecCna8gjisajYzTW9nMM0CvFR88RkOvzCeK8OGkcuuQH8_rThfviu76_LGavjMFn6aFRI6XcAdBOJNXqK1M57JzmyUQaUUebnnNurCj-Zy5znbH_/s1600/014480x640.jpg 
 The Grand Prize will be a 24-pack of Spectrum Noir Markers in Pastel, Ultra Smooth Premium White Cardstock for Alcohol Markers (20 sheets), a Spectrum Noir 36 Pen Zipper Bag and a Mulberry Wood (Gone Fishing) stamp set.

There will also be a 2nd prize of $25.00 (U.S.) gift certificate!  And each Design Team Member will offer a challenge with a prize for the Scrap-a-Thon in the Forum of Sketches 4 All.

To get the chance at winning this prize, you MUST leave a comment on ALL of the Design Team member's Blogs listed for the Hop AND participate in the Scrap-a-Thon Challenges.  You won't want to miss out on this fab prize!

So, become a member of Sketches 4 All (which is easy and Free) and jump start your creativity with lots of inspiration and fun challenges.

Please make sure you visit the entire team and leave comments (everyone loves kind comments), as members are hosting additional blog challenges and offering their own prizes for you.  So, the more you play, the more chances you have to win.

Also, each Design Team Member will offer an additional challenge with a prize for completing challenges in the Scrap-a-Thon.  You can find the challenges here.  My challenge for you at the Scrap-a-Thon is a WORD Challenge and I would love to see you joining in on the fun.  You can find all the details for my challenge here.  I will also be offering a prize to one random winner.

Here's my inspiration layout:
 
This is my son and I at a Boy Scout weekend Camporee a couple of years ago.

I created my own mask for the clouds and misted the sky.


 These tree stickers add an "outdoorsy" feel to the page.

The stickers were adhered to cardstock and trimmed.  I used pop dots under the tent to add some dimension to my page. 

I knotted twine and place it in the upper left corner of the photo.

 The emblem was cut from pp, the edges distressed and I then added knotted twine around it and adhered it with pop dots.


For added fun, I will also be offering a prize right here on my Blog.  All you have to do is:
1.  Leave me a comment at the end of this post.
2.  Become a Follower of my Blog and, hopefully, you will want to remain a follower.  :)

One lucky winner will be chosen to receive the prize below.  I will announce a random winner here on Wednesday, April 10, 2013.  So please check back then.  You will have 7 days to contact me via email (pbllib (at) myfairpoint (dot) net) with your mailing info.  Your prize will be forfeited after 7 days.

Here's a photo of the prize I will be offering:


Are you ready for more inspiration and a chance to win another prize?

Then hop on over to Lisa's wonderful blog to see what she has in store for you.
 Please also welcome Brenda to our Design Team as well.  And, Rachelle will be our April Guest Designer.  She will be offering a challenge for us this month that you are not going to want to miss out on!

In case you get lost along the way, here is the complete Design Team lineup for the Hop:

Libby - You are here

Just a reminder...
After you have visited all the blogs, please check out more fun challenges at Sketches 4 All Scrap-a-Thon.

Thanks so much for stopping by!

Happy Hopping!

Sketches 4 All BLOG HOP & SCRAP-A-THON

Hi everyone!!

Don't forget about the Sketches 4 All
Spring Blog Hop & Scrap-a-Thon.

All the fun begins April 1st and runs until April 7th!!
Hope to see you there!


Hello,


Saturday, March 30, 2013

Spring Flood

Hi there,

It's a wonderful Saturday!  Warm enough to open all the windows and get some fresh air!  Woo hoo!

Guess what?  I made it to Week 13 at Colorful Creations for their So You Think You Can Scrap Challenge.
So super excited!

This is the sketch we are to use:
 

And here are the list of requirements that MUST be used on your layout:

1.  Use ONLY PURPLE papers (printed, cardstock or home made).
2.  ALL embellishments must be BLACK & WHITE.
3.  2 Hand made flowers
4.  2 Different Stamps (your flowers will not count).
5.  2 Hearts.
6.  2 Different ribbons.
7.  Faux Stitching (hand drawn).
8.  Bling (clear bling will be accepted).
9.  Feathers
10.  Stay true to the sketch (using 12x12 double page layout).

This was such a hodge podge of things to add to create my layout!  Trying to make it "all work" was challenging!!

Here's what I created:
I used all the requirements stated above.  Not crazy about this layout... but I added everything I needed to!

Supplies used:
Paper: Colorbok, DCWV, Other
Paper Tearing
Flowers: Hand Made
Ribbons
Feathers
Bling
Black Stickers Title
Sharpie Marker
Heart Punch
Clear Sticker Sub Title
Ink: A la mode Black
Corner Flourish & Swirls Stamps
Stitches Template
 
I added the letter stickers over the stitching. 
 
White ribbon was added above the center paper strip and black and white polka dot ribbon added below it.  Bling was added below the flower.  I hand made the flower.
 

I added a corner flourish stamp on the upper left of my photo. 

Another hand made flower.  I added a swirl stamp just under the flower.  The stitches were created using the help of a stitching template.
 
I tore this small strip of cardstock and added a row of bling.
 
A clear sticker with black marking was added as a sub title.

Just below my journaling I added a small black heart and white heart.

The hand drawn stitches were added right over the feathers.
 
Bling was added on each corner of the photo matting.

Another look at my faux stitching and hand made flower.


Here's the story behind the feathers.

One of the requirements was to use feathers on your two-page layout.  Feathers!!!
Of course, I didn't have black feathers or white feathers.  So, after experimenting with several different techniques, I decided that by using a sponge brush and black paint... the feathers would be BLACK!
All I had were primary colors for my feathers.  So, I simply grabbed a couple of them and got to work painting them!  Love how they turned out!!

Here's a closer look at the feathers.... painted black!

Thanks so much for stopping by!
Have a wonderful Easter Sunday.
 

Cabbage Patch Doll

Hello all!
The sun is shining and it's melting the snow... yay!!  We can once again see our front lawn and the flower garden in front of my house!

I have a layout to share with you today that was submitted at Sketches 4 All for the March Guest Designer Challenge.

Here are the challenge requirements:

1.  Use a Polaroid/instagram photo.  If you don't have a Polaroid, you can create your own or purchase one.
2.  Layer 3 or more patterned papers or embellies.
3.  Use mixed alphas in your title or journaling.

Here's what I created using a Stickers N Fun (Nov 2008) sketch:
This is our daughter holding one of her favorite dolls... the Cabbage Patch doll.  Anyone remember those?  She had more than one of them!

I used a Polaroid frame, layered 3+ pp and used mixed alphas.

Supplies used:
Paper: DCWV, Momenta
String
Stickers Title
Embroidery Butterfly Border/Ribbon
Martha Stewart Border Punch
Pop Dots

The cute little banner.

Here's a better look at the layers and embroidery butterfly ribbon.  Isn't it cute!  This was the last strip I had in my stash.

 The Polaroid frame was printed online.  There were lots to choose from!

I used stickers for my title... some are squares in varying colors of pinks and the "doll" letters are larger stickers.

I used a border punch on one of the strips of papers and pop dots under the photo to compensate for the bulkiness of the butterfly ribbon.

Thanks so much for taking a peek at my blog.
Have a wonderful day!

Tilling the Garden

Hello everyone!
Happy Saturday to you!  Easter is only a day away.

I have a layout to share that was submitted at Colorful Creations for their Twisted Blueprints Challenge (twistedmar).  This is the sketch:
 

The twist is to use Striped Paper and Stars.

Here's what I created:
Here I am, tilling our garden last Spring.  It sure was a challenge... but I got it done.

The paper behind the photos are striped and stars were added.

Supplies used:
Paper: Colorbok, DCWV
Cardstock Title Letters
Sharpie Marker
Stars: Cut from Stencil
Distressing
Perfect Pearls Mist: Sunflower Sparkle
Silver Color Mist: Wilton
 
This shows the misting on my background paper.  The paper title letters were distressed and I wrote the rest of the title.

The star was cut from stencils and misted with a couple of mists.

More misting.  Love this yellowish mist and silver.

Thanks for stopping by!

Thursday, March 28, 2013

Easter Card

Hello!

How is everyone doing today?  Anything interesting happen?
Nothing much on my end of the world.  Played around with making my own gems and glitter gems.  That was so totally cool.... a bit messy... no... REALLY MESSY, but it was worth it.  I've been having fun adding them to my layouts.

Today, I have a cute Easter card that was submitted at Sketches 4 All for their Technique Tuesday Challenge, which is Embossing (TECH-TUESDAY).

Here's my card:
I finally got to use my new embossing Folder from Cuttlebug!  Yay!

Supplies used:
Paper: White Cardstock
Foam Easter Egg
Ribbon
Cuttlebug Embossing Folder
Sentiment
Inks: A la mode Pink, Vivid! Raspberry


Thanks so much for stopping by.
Have a wonderful day!


Wednesday, March 27, 2013

Just Chillin'

Hello,

My final post for today is a layout which was submitted at Sketches 4 All for their Word Prompt Wednesday #4 Challenge (WPW4).  The word to use on your project is "Chill."

Here's what I created:
Here's my boy at a Boy Scout Winterama event.  The boys had to shovel huge piles of snow so they could begin the task of actually digging out their igloos.  They shoveled so hard... and would have to take breaks, sitting in the snow, drinking water.

I used the word "Chillin" in my title.

Supplies used:
Paper: Colorbok
Washi Tape: Home Made
Perfect Pearls Mist
Ice Stickles
Snowflakes Stencil
Cardstock Title
Distressing
Magic Mesh
Sharpie Marker
Brown Mist
Sketch: Page Maps (Sept 2005)
 
I added a small square covered with Magic Mesh.


I made the washi tape by sticking regular tape onto words.  In this case, I used a Scouting magazine to get these cool words.  Then I soaked the tape into water, wait for it to soak and rub off the sticky part of the tape.  So cool to make!

I found this title in my stash and used a marker to trace around the letters so they would stand out more.  I then used distress stain over the top of the tag, to tone down the bright white of the cardstock.  The edges were distressed and stained.

Here's one of the snowflakes.

I started with just a brownish mist, then added Pearl Mist and finally ended up using Ice Stickles on top of that.  I finally got the look I wanted!


Thanks so much for stopping by!