Showing posts with label Lets Capture Our Memories. Show all posts

Monday, September 9, 2013

Daisies

Hi!

Here's a layout that was submitted at Let's Capture Our Memories for their Sketch #36 Challenge.
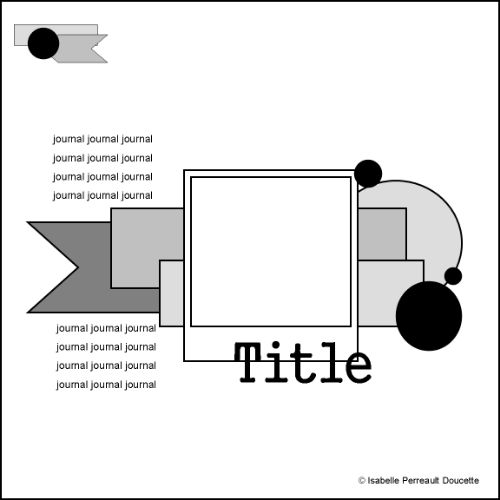
This is the sketch:

And here's my layout titled, "Daisies."
I had an abundance of daisies in my garden this Spring!  So pretty!

Supplies used:
Paper: DCWV, Colorbok
Darice Embossing Folder
Cuttlebug Embossing Folder
Clear Sticker Letters
Circle Punches

I embossed two of the larger circles for something different... which is definitely better than the plain cardstock!

Here's the upper left of my page.

I ran out of "e's"!!!  So bummed!  So, as I looked around on the page for a way to create my own "e" with anything else... I saw the "3" and turned it upside down!  Wa la!  Here's my page title.  :)

Thanks so much for stopping by!


Sunday, June 23, 2013

Happy Birthday Card

Hello,

Here's another card that was submitted at Let's Capture Our Memories for their Sketch #25 Challenge (LCOM25).  This was a super fun sketch to work with.  You can see the challenge here.


Here's my card:
Supplies used:
Paper: DCWV, White Cardstock
Sentiment
Ink: A la mode Black
Ribbon
Prima Flowers
Gems: Home Made
 

Here's a couple close ups to give you a better look at the cute flowers and "fun-to-make gems!" 

Thanks so much for stopping by!

Friday, February 22, 2013

Timeless Beauty

Hi there,

This layout was submitted at Let's Capture Our Memories for their Sketch #5 Challenge, which is actually a card sketch but I couldn't see it as a card, so I created a layout with it.
 
Here's the sketch:

 This is what I created:
This is our daughter's school photo taken when she was 11 years old.

Supplies used:
Paper: Colorbok, DCWV
Lace
Chenille Ribbon
Flowers
Sticker Title: Phrase Cafe
Martha Stewart Border Punch
 
I punched each strip along the tops only.  Lace was adhered under the cardstock and a strip of chenille ribbon added to cover the seam.

A couple flowers were added on the lower right of the photo.

Here's my flower grouping.  I decided to add a touch of yellow to the flowers.

I added some these cute little styrofoam balls as the centers of the two white flowers.

 Here's a look at the dimension.

Love these flowers!  :)


Thanks for stopping by!

Friday, February 15, 2013

It's not what you look at that matters...

Hi there,
It's Friday!  I always love Fridays!!  I think that love came from working almost 20 years in an office and starting Monday morning at work... I couldn't wait for Friday!  Yes, it did make for a longer week.  Even thought I loved my job(s) I was always anxious for Friday!  On stressful days... made me want that day to come that much more quickly!

Today, I have a layout that was submitted at Let's Capture Our Memories for their Sketch #6 Challenge.  This is the sketch:


This is what I created:
Lynn and Andrew having fun with the Bomber hat that Andrew got for Christmas several years ago.  As you can tell in the photos, Andrew is still half asleep while Lynn is all smiles!! :)

Supplies used:
Paper: DCWV, Colorbok
Distressing
Vellum Quote
Quote shape: tracing Nestabilities Die
Bling: Forever in Time
Perfect Pearls Mists: Forever Red
Stick Pin: My2angels
Bauble Word: K&Co.
Stampin' Up! Border Punch

  
I added a bauble that says, "Loved" at the corner of both photos.
 
Red/Pink bling was added by the photo and a stick pin.
 
I tucked the end of the bling just under the photo.  The quote shape was traced using a Nestabilities Die.  Cutting the shape using the die was too small, so I traced around the outer edge of the die.
The quote is on vellum which was adhered to cardstock that was misted then hand cut.  This photo shows a closer look at the misting too.
 
More bling.

Here's a look at the right side of my page showing all the strips of papers, the distressed circle and misting.  After misting heavily in some spots, I tapped the circle on the desk to make the misting run down a bit.

Have a wonderful day.
Thanks for stopping by!
 

Thursday, January 24, 2013

Learning

Hi again,

Another great sketch!  I submitted this layout at Let's Capture Our Memories for their Sketch #3.
Here's the sketch:


This is what I created:
This is our grandson at a Cub Scout event which was going on at the same time as the Boy Scout Camporee (which I was at).  I was so excited to be able to check out what he was doing while the boys from our Troop were doing other activities.  He was glad to have his Grammie there too!  I could tell, because he was always searching the crowd looking for me.  It was the cutest!

Supplies used:
Paper: DCWV, Colorbok
Stickers Title: Karen Foster Design
Sharpie Marker
Cardstock Fish hook: Fresh Cuts
Distressing
Safety Pin
"Cub Scouts" Sticker: It takes two
Scallop Border: Creative Memories Template
 
My journaling strips.  I angled the right side to match the banner above them.
 
These letters are probably geared more towards "school" but I thought they fit perfectly with these photos... as he was learning how to tie knots with the fishing line.
 
I adhered the sticker to cardstock, trimmed it and added a safety pin through the top.
 
The edges were distressed on this cardstock die cut.


Thanks for stopping by.
Hope you'll visit again soon!

Friday, January 18, 2013

BEAUTY

Hi there,
Wow... it sure is COLD out there!  Jack Frost was on several of our windows in our entryway, which isn't heated!  I tried to get photos of the frost, but they didn't turn out that great.  I will have other opportunities to try again though!

I have a layout to share that was submitted at Let's Capture Our Memories Blog for their Sketch #1.  This is the sketch:


Cool sketch, isn't it?  At first I wasn't sure what I would do with all these banners, but once I got an idea, I went with it and this is what I created:
I decided on lace fabric for the banners.  Love how this turned out.  Smaller paper banners were used over the lace.
This is just a small portion of my flowers.  I love all the colors!

Supplies used:
Paper: Colorbok, Momenta
Lace Fabric
Foil Embossed Gems: Forever in Time
EK Success Corner Rounder
Cardstock Letters
Sharpie Marker

Love these foil embossed gems.  The only thing I'm not crazy about is the clear plastic showing behind them.
 
 Three smaller banners were added below my journaling block.

More swirly gems were added in the lower corner of the photo.  You can also get a better look at the lace fabric.
 
I hit the jackpot garage sale this past year where a lady was selling all her lace and silk fabric!  I looked at how much she had and knew I had to have it.  She was surprised when I looked at her and said, "I want it all... what's your price?"  Super sweet price too!  :)

I used my paper cutter to get the sizes cut that I wanted.  Then folded the ends in half and cut the banner edges.
 

The letters don't show as well as I was hoping for, but I still like them!

I hope you enjoyed your visit.