Showing posts with label Soul Scrappers Soul Quest. Show all posts

Monday, September 30, 2013

Soul Scrappers Soul Quest Challenge

Hi there!

I'm hosting my very FIRST Soul Quest at Soul Scrappers (SSQ19).

I hope you will stop on my Soul Scrappers and check it out.

I will also provide "most of" the write up from the challenge... in hopes that it will entice you to sign up to play along!  It's a LOT of fun!


I've been participating in these Quests since I joined S.S. and it's so fun to receive goodies to create your masterpiece with.
I hope you will join in on the fun.  And... besides... who doesn't love FREE stuff, right?
This Quest is all about "Nature."
Here are a couple of definitions of "Nature" from the online Dictionary that I found:
** "Phenomena of the physical world including plants, animals, the landscape and other features and products of the earth."
** "Everything that was not made by man (stones, animals, plants, wine, rain, mountains, natural scenery)."
And my favorite: ** "The world of living things and the outdoors."
And here's a lovely quote that I have also chosen to inspire you:
"Climb the mountains and get their good tidings.  Nature's peace will flow into you as sunshine flows into trees.  The winds will blow their own freshness into you, and the storms their energy, while cares will drop off like autumn leaves."
-John Muir
Here's the fun part:
You will be sent a pack of embellies to use on your page.  Everyone receives the same items (color and size may vary).
The concept is to scrap a page using all or most of these items.  You can add anything you like, but you must use all or most of your FREE stuff.
Now for the important part:
By adding your name to the list, you agree to use all or most of the FREE goodies supplied.
You can make a card, layout, sewn item, altered item or mixed media item.
When you have finished your creation, upload it to the Gallery using the tag:SSQ19.
Signups will be in this thread and will run from October 1st until October 15th (two weeks) OR until we reach our quota of 15 participants.
What makes this Quest unique?
Until you open your envelope, you are really not going to know what is in it, and what you are expected to use.
Some of the embellies could be shop bought, painted items, stickers, stamped images, polymer clay items, metal items, hand pieced images, hand made flowers, sewn items, felt items, ribbons, etc... and the list goes on.
Important:
Once you sign up, PLEASE PM (private message) me your address... or you can also email me at pbllib@myfairpoint.net.
DO NOT post your address in this thread!!
Now for the benefits of the Quest (Yes... there are benefits)!
1.  You scrap items you may never have thought of scrapping before.
2.  You got to see how other individuals (who are participating) use their items and you will be amazed at all the creative ideas.  And from these ideas, it may cause a flow of new ideas for you to try.
3.  You use techniques and ideas on your future scrapbook pages.
4.  This challenge makes you think "outside the box" and you become more creative and arty!  How cool is that?
5.  Perfect for beginners because you will learn so much.  So, if this is your FIRST Quest, I encourage you to give it a try.


Ok, here's the rundown (A shorter version):
1.  Signups run from Oct 1st until Oct 15th (2 weeks).  Then goodies will be mailed out.
2.  Open to the FIRST 15 participants.
3.  Be sure to PM me your address.
4.  You will have until Nov 30th to add your entry in the Gallery using the tag:SSQ19.  
5.  Remember, this Quest is all about "Nature."  However you want to interpret it for your project is up to you.
6.  You can make any project.
There will be PRIZES offered too!

So... are you ready for some fun?
Then please sign up!  :)

Thanks so much for stopping by!
Soul Scrappers Design Team Member


Monday, September 16, 2013

I am Me

Hi there,

Here's a layout that was submitted at Soul Scrappers for their Soul Quest Me, Myself & I (SSQ18) Challenge.  You can see the challenge here.

Here's how it works:
You have to complete the requested number of challenges in order to "sign up."
Once you're signed up... you will receive FREE goodies in the mail... in which you're to use up ALL or as much as you possibly can for the challenge and added in the Gallery.

So... this challenge is all about YOU... or, I should say, ME!  :)

This is the list of goodies I received and how I used them all:

1.  Girl sticker sign x1 = On the right of my page.
2.  (Tiny) girl wood veneer x1 = On the right of my page... on the longest tag.
3.  Girl paper shape x1 = On the left of my page just below the photo... and she's all decked out.
4.  Twine = As a bow tied around the netting on my page title; as the flower centers; on two of the tags; made into a heart on the paper girl; and, as a bracelet for the paper girl.
5.  Flower shapes = Embossed, inked and the edges bent, curled and folded (on my page title, on the paper girl and on the pocket).
6. Talking/thought bubbles = One was tucked under the page title tag "I am" and the other was tucked under the upper right corner of my photo.
7.  Number "5" = Used on the longest tag and tucked into the pocket.
8.  Maroon scalloped tulle = twisted and used as a border around the pocket; threaded through the small metal tag on the pocket; gathered with needle & thread to create a skirt for the paper girl; threaded through the "I am" page title and along the top of my page.
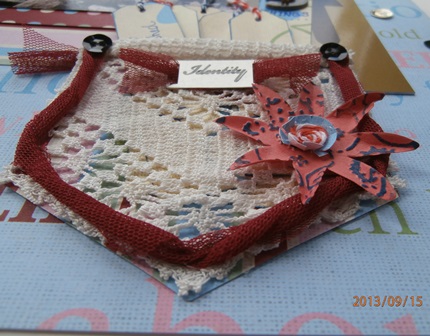
9.  Crochet lace piece = Created into a pocket and the top portion was rolled.
10.  Assorted sequins (approx. 10) = I received 10... and several are scatted on my page; two silver ones were added on the girls' shoes and one for her bracelet.  Two darker sequins were added at the top, on each corner of the pocket; one is just above my photo on the thought bubble.

Wow!!  
I USED ALL THE EMBELLIES I RECEIVED!  :)

Prizes will be awarded by:
1.  One point for each embellie used = Maximum of 10 pts.
2.  If you use ALL the embellies = 2 x bonus pts.
3.  Presentation, balance and overall look = 4 pts.
4.  Creativity using embellies = 4 pts.
For a total of 20 points.

And prizes awarded for:
1st Prize
2nd Prize
3rd Prize
And, there will also be a random draw.

So, LOTS of prizes to be awarded!  How cool is that?!?!

Since this Soul Quest challenge is all about YOU, as part of the challenge you must include 5 things about yourself included in some way on your layout.

Now, here's my layout titled, "I am Me."
This is me... very close to reaching the top of Katahdin in 2010.  I decided to sit for a spell and enjoy the views (along with catching my breath)!  Hee hee!  

Other supplies used:
Paper: Colorbok "All About Me" Kit
Markers
Rick Rack
Twine
Hole Punch
Metal Embellie: Colorbok
Chipboard Word: Colorbok
Cuttlebug Embossing Folder
Ink: A la mode Blue

The flowers were embossed and an ink pad brushed over the raised areas and the edges were curled.
The maroon tulle was threaded through the tag.  One of the thought bubbles were tucked just above the flower & tag.

The tulle goes along the top of the photo and tied into a bow with twine.
Another thought bubble was tucked under the upper right of my photo with a sequin added on it.

My little paper doll was decorated with a skirt which I gathered with needle and thread then added rick rack over it... and finished it off with an embossed and inked flower.  The center of the flowers have twine wrapped in a circle.  The twine is added onto small cardstock circles and snipped along the edges so I could fold them up for some dimension.

The lace was adhered onto patterned cardstock with tulle twisted around the edges as a border.  The lace at the top of the pocket was rolled under and sequins added on each corner.  Tulle was threaded through the small metal tag that says, "Identity" and an embossed and inked flower.

The large girl sticker sign was placed to the right of the photo.  Tags were tucked into the pocket which include 5 things about me.

Here's a closer look at the cute pocket!  :)

The chipboard word was brushed with a blue ink pad... just for something different, and placed over a strip of tulle.  Then I used a heat gun to dry the ink faster.

A closer look at my paper girl.  She also has a sequin bracelet and sequins on her black patent shoes.  A heart was created out of the twine we received.

And, finally, here's what the tags look like.  I also inked around the edges of each tag too.  
This is what I wrote on each of the tags:

5 things about me:
1.  I'm proud of all I have accomplished.
2.  Laughing is what keeps me sane in this insane world.
3.  I have arachnophobia (an intense fear of spiders).
4.  I dream of being a world traveler.
5.  I love being spoiled.

I hope you enjoyed the journey about me and all the fun ways I used the embellies I received.

Thanks so much for stopping by!

Soul Scrappers Design Team Member


Friday, June 28, 2013

Sewn With Love

Hi there!

It's FRIDAY!  I love Friday's!!  

Yesterday was the best day ever... because our son came home!  A surprise for hubby and I, as we never suspected a thing!  Our daughter and son were planning this for over a month!
It's so awesome to have him home (in this otherwise gloomy, depressing time)!!

The pictures have already started!  For a month, there will be TONS of photos taken!  Woo hoo!

Anyhow, I have a layout to share that I started before our son came home... and just finished today.  This was submitted at Soul Scrappers for their Soul Quest #17 - Sew Good Challenge.  You can see the challenge here.  Check it out!  You may want to hang around at Soul Scrappers to see the next Soul Quest.

And... FYI:  I will be hosting the Oct/Nov Soul Quest.  You won't want to miss out!  :)

Here's how it works:
You must complete a certain number of challenges at Soul Scrappers to be signed up.  Once completed, you will receive an envelope of (FREE) goodies to create your project.  You can create a card, layout or any altered item.
The challenge is to use ALL the goodies you receive.

This is a list of the goodies I received (which vary with each quest):
1.  1 x piece double sided paper
2.  1 x piece fabric
3.  2 x stamped images
4.  2 x scalloped die shapes
5.  2 x round die shapes
6.  1 x piece black lace or ribbon (I received ribbon)
7.  1 x metal embellie
8.  3 buttons (I received 4)
9.  1 x pattern tissue

I USED ALL THE GOODIES for my layout:
This is Andrew and I on Halloween in 1996.  I made the costumes.  Andrew is a Dalmation and I am Little Bo Peep.  I went to work this way too... then came home, got Andrew dressed up and we went Trick-or-Treating.  :)

Additional supplies used:
Paper: My Mind's Eye
Tag: Home Made
Hole Punch
Gold Metallic Paint
Various Perfect Pearls Mists
Wilton Gold Color Mist
Sticker Letters
Sketch:  Page Maps (Jan 2006)

 
The double sided pp was used under the photo... and one side was torn.  Then I added a strip of pattern tissue and lace.   The flower was hand cut, folded and adhered onto a piece of paper and scrunched a bit.  Two banners were cut and tucked under the flower.  For the center, I used ALL the pieces left over from cutting out the flowers, scrunching them into balls and adhered them in a cluster.  Then I misted everything.

I made snips all around the top flower and using my embossing tool, curled all the ends under and at an angle.  The metal brad was added in the center.  Two more tissue paper strips were cut into banners and tucked under the flower.  I fussy cut the stamped image and tucked it within the flowers.

 After cutting the tag from pp, I wrapped it with a small piece of the pattern tissue.  The ribbon I received was pulled through the hole in the tag and looped.  The tag was misted with Perfect Pearls mists.  The sewing machine was fussy cut also with another flower covering a portion of the sewing machine.  The two die cut circles were snipped around the edges and scrunched.  Circles were cut from the pattern tissue and also scrunched for some dimension.  The button was painted with gold metallic paint and heat embossed until it bubbled and dried with a texture on it.  Finally, the clear stickers were added as the page title.

Trying to give you a letter look at the misting on the tissue pattern.


The bright black ribbon was turned over which revealed a more subtle color which was misted with gold color mist.  From the paper tearing on the double sided paper I received behind the photo, the remaining strip was added slightly over the ribbon and three buttons were added.  I used the same technique with these buttons also.  Mauve buttons really didn't fit with my page theme, thus the reason they were painted and heat embossed until they bubbled.

A closer look at the buttons.

Here's a better look at one of the flowers.
 
 
Here's a look at the left side of my page.

Hope you enjoyed your visit and will return soon.
Thanks so much for stopping by!

Saturday, May 11, 2013

My Kids

Hi there,

Ewwww!  It's a yucky day today... cold and rainy and of course, windy!  So glad I'm stuck inside!  :)
And the best part... I have the WHOLE weekend to MYSELF!!!  I'm lovin it!

I have a layout to share with you today that was submitted at Soul Scrappers for their Soul Quest 16, Motherhood (SSQ16).

To be able to play along, you have to complete THREE of the March and April challenges.  A goodie pack was sent to all participants with 10 items included, in which you must use everything you received to create your project.

The theme for this Quest is "Motherhood" and you must also use a "mother" quote.

Winners will be determined by:
1.  Most creative use of the heart shaped item.
2.  Best Quote.
3.  The overall best layout.

This is what I created in the wee hours of last night!
Our kids, all excited about completing Basic Training and had to show off the t-shirts that Lynn got form the both of them... and they had to show off the muscles they acquired too!  They even had a push up competition right in our living room!

Soul Quest List of Goodies:
1/2 Doily
Fabric Heart Shape
Pattern Paper x2
Music Paper
Lace
Chipboard "M"
"Quote" Block
Shimmer Paper
Serviette (Shoe?)
Feather

Other supplies I used:
Paper: Colorbok, My Mind's Eye
Button Flower Center
Cardstock Letters (page title)
Sharpie Marker
Decorative Fibers
Gold Color Mist
Perfect Pearls Mist: Heirloom Gold
Sketch: Page Maps (Apr 2007)

Here's a closer look at the title letters.  The chipboard "M" was used in "My" and all the letters were misted with gold and perfect pearls.
 
I was trying to get a good shot of the feather... which was misted lightly with gold perfect pearls.

Here's a closer look at my lace flower.  I really wasn't sure what to do with the lace.  And the color just didn't work with my page, so I misted it with both mists to try and blend the color more.
Not sure if it worked....

Here's the shoe... which really didn't fit with my page, but I used it anyhow.

I used a ball button for the flower center.  The flower was wound around onto a small paper circle so I would have something to attach the lace to.

The feather was tucked under the flowers.

In the upper left, I added small banners, which were cut from the pieces left over after trimming around the shoe.

The "quote" block was also misted and matted on the music paper and a small bow was added using fibers.
The quote I chose:
"Motherhood has the greatest potential influence in human life."
 

I added several more banners tucked under the flower, finishing up all the left over pieces from cutting around the shoe.

 The fabric heart was misted with two different mists and fibers were wrapped around it before adding "My" on it.

I used ALL of the goodies I received!  Woo hoo!!

Thanks so much for stopping by!
Have a wonderful crafty weekend!