Showing posts with label Me & My Big Ideas. Show all posts

Friday, November 22, 2013

Family

Hi there,

Here's another layout that was submitted at Turtle Soup for their November Mini Crop - Family Challenge.

My layout is appropriately titled, "Family."
Our daughter and grandson... chilling on a hot summer day.  Lynn was testing out Andrew's new camera.

Supplies used:
Paper: Me & My Big Ideas, Colorbok
Ribbon
Flowers
Rick Rack
Bard
Gems: Home Made
Metal Page Title
Circle Punch
EK Success Border Punch
Marker
Sketch: Page Maps (June 2013)

Journaling was added above the photo with a punched border and rick rack. 

Two circles were added under the flower as well as rick rack.  Ribbon was threaded through one end of the metal tag and the other end was placed in the center of the flower with a gem on top.

A closer look at the journaling block.

To the right of the photo is another circle, flowers and rick rack.  The center of the larger flower is a brad.  Ribbon was added across the page below the photo.

Thanks so much for stopping by!


Thursday, November 14, 2013

Out on Vacation

Hello,

I have another layout to share with you today that was submitted at Colorful Creations for their Member Spotlight Sketch Challenge (GDTNOV13).  You can see the challenge here.

The sketch:

And my layout titled, "Out on Vacation."
These photos are a couple of the many that I took while on a short trip near the lower portion of our State to see the Observatory.  So cool!

I decided to use two photos rather than the three from the sketch.

Supplies used:
Paper: Me & My Big Ideas, Colorbok
3D Embellies: K&Co.
Ribbon
Darice Embossing Folder
Sticker

In the upper corner I added a couple strip of paper and a sticker.

Ribbon is trailing from the 3D embellie with small banners below the ribbon.

The 3D page title.

The brown cardstock was embossed.

Thanks so much for stopping by! 

Colorful Creations Design Team Member


To Travel is to LIVE

Hi there,

Here's a layout that was submitted at Soul Scrappers for their Around the World - Morocco Challenge (ATW12).  You can see the challenge here.

These are the Inspiration Photos:


I took inspiration from:
The 2nd photo:  The colors and archway.
4th photo: The archway and the triangles.
Last photo:  The design.

Here's my layout titled, "To Travel is to Live."
This is Andrew and I at Disney World in front of the entrance of Magic Kingdom Castle.  So fun!!

Supplies used:
Paper: Me & My Big Ideas, Colorbok
Glitter Gems: Home Made
Gold Wire Ribbon
Various Stickers
Cardstock Quote
Sketch: 2 Broke Girls

In the upper corner I added a couple strips of paper and a piece of the wire ribbon that I snipped off one side of the wide ribbon.

More of the gold wire from the ribbon was added as a photo corner.

Lots of glitter gems along the right of the photo.

Here's the gold wire ribbon... which I cut into triangles along one side.  Hard to see in this photo... but the next photo you can see it a bit better.
Various stickers were tucked just under the page title.


Thanks so much for stopping by!

Soul Scrappers Design Team Member


Thursday, November 7, 2013

Cherish

Hi there,

I have a layout to share that was submitted at Colorful Creations for their Say It With Words - Cherish Challenge (SIWWNOV).  You can see the challenge here.

This is my layout titled, "Cherish."
The challenge word for Nov. is "Cherish" which I used as my page title.

This was such a wonderful time... when our daughter came home after being deployed overseas for six months... and wanted this to be the surprise of her son's life!!  And it was!!  We were so happy to have been a part of this!!  Her friends were too!  It was truly a moment to cherish forever!!

Supplies used:
Paper: Me & My Big Ideas, Colorbok
Darice Embossing Folder
EK Success Border Punch
Glittery Swirls & Flowers
Sentiment Sticker: Marcella By K
Chipboard Arrow: K&Co.
Marker (to color arrow black)
Sketch: Page Maps (Sept 2013)

Love, love, love this glittery swirls... with bling too!
I used a punched border just under the swirls.

The title sticker was matted onto B&W cardstock with two glittery flowers added.

Another look at the beautiful swirls and dimension.

Thanks so much for stopping by!

Colorful Creations Design Team Member


Wednesday, November 6, 2013

Max Loves Popcorn!

Hi there,

I have a layout to share with you that was submitted at Sketches 4 All for their November 1st Sketch Challenge (NOVsketch1).  You can see the challenge here.

The sketch:

And here's my layout titled, "Max Loves Popcorn!"
While I was eating popcorn, Max was SO interested and kept trying to jump on my lap... so I gave him one... not really thinking more about it.  BUT... he absolutely LOVED it!  So, we both were eating popcorn!  I just had to hold this one piece in front of him while I took the photo.  Look at that sweet little nose!  He's such a cute little character!

Supplies used:
Paper: Me & My Big Ideas
Stampin' Up! Border Punch
3D Border Sticker
Clear Stickers
Pop Dots
Sticker Letters
Photo Corner Stickers
Tickets
Staples
Circle Punch
Stick Pin

Here's a look at the upper portion of embellies on the left of my page.  The dog tag was matted onto two different pp and then on a larger cardstock circle.  The little bone was adhered onto cardstock, trimmed and added with a pop dot for some dimension.  I wrapped a banner around the stick pin.  Two tickets were staples together.

Just below the tickets I added more clear stickers.

Love these borders!  The 3D bones border was added under the photo.  And the cute little strip of doggie prints that I found in my stash and just had to use on my page!

On the bottom rectangle strip, I adhered a dog with pop dots and added a ball sticker too.

Here's a closer look at the left side of my page.
 
And another look at the dimension.  Part of the page title was added under the photo and the rest of the title was added on the right of the border strips.

Thanks so much for stopping by!

Sketches 4 All Design Team Member


Thursday, October 31, 2013

Hold On!

Hi there,

It's time for another Song Challenge (novsong14) that I'm hosting at Colorful Creations!  I hope you can join in on the fun too!  You can see the challenge here.

This months' song is by Air Supply titled, "All Out of Love."

Here are the lyrics:

I'm lying alone with my head on the phone 
Thinking of you till it hurts 
I know you hurt too, but what else can we do? 
Tormented and torn apart 

I wish I could carry your smile in my heart 
For times when my life seems so low 
It would make me believe what tomorrow could bring 
When today doesn't really know, doesn't really know 


CHORUS
I'm all out of love, I'm so lost without you 
I know you were right, believing for so long 
I'm all out of love, what am I without you? 
I can't be too late to say that I was so wrong 

I want you to come back and carry me home 
Away from these long lonely nights 
I'm reaching for you, are you feeling it too? 
Does the feeling seem oh so right? 

What would you say, if I called on you now 
Saying that I can't hold on 
There's no easy way, it gets harder each day 
Please love me or I'll be gone... I'll be gone 

CHORUS

What are you thinking of? 

CHORUS x 3


And a photo of the band:
November Song Challenge

There are plenty of words to choose from... and here are a few examples to hopefully spark an idea or two for you to play along:
phone
thinking
I know you
I wish
believe
smile
heart
love
What are you thinking of?

The challenge is to use word(s) from the lyrics to create your project.  You can choose one word, a line from a chorus, the whole chorus or even the title song... or whole song.

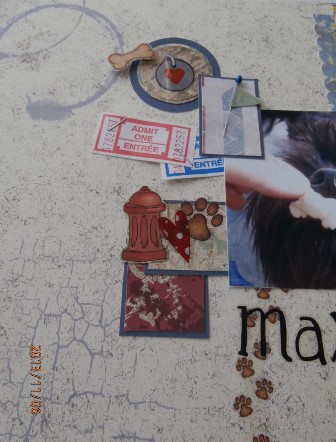
Here's my example layout using the words "Hold On" which is also my page title.
Our son having a blast tubing! 

Supplies used:
Paper: Colorbok, Me & My Big Ideas
Foam Clouds & Border
Pop Dots
Sticker Letters
Swirly Bling
Star
Stickers
Toothpick Banner
Distressing
Perfect Pearls Mist
Sketch: Page Maps

The circle was distressed and adhered with pop dots.

Swirly bling was added just under the foam border strip.  It's hard to see... so look closely.  :)

A different angle.

In the lower corner I added a mulberry paper star with a couple stickers over it.

The foam clouds were misted with a pearl mist... but it's hard to see it.

You can just get a glimpse of the mist on the clouds.  The banner was created using a toothpick and adhering a triangle onto it.

Thanks so much for stopping by!
I hope to see some of your creations in the Colorful Creations Gallery!  :)

Colorful Creations Design Team Member