Wednesday, March 6, 2013

Boys Will Be Boys

Hello,

I have a layout to share that was submitted at Scrap Your Story for their FIRST Challenge: Just One Photo.  This is a fairly new challenge site that caught my eye so I thought I'd participate.

Here's what I created using a sketch from Stickers N Fun (April 2008).
Here's a super sweet photo of our grandson when he was 19 months old.   Hard for me to believe he's now 11 years old!!

Supplies used:
Paper: Colorbok, DCWV
Buttons
Cardstock Die Cut Title & Bug Circles
Ribbon
Brads
Distressing
Sharpie Marker
White Color Mist: Wilton
Mister Huey's Color Mist: Shine
Distress Stain

I torn the paper and distressed the edges of all the papers.  The three cardstock bug circles were found in my stash.  I distressed the edges and added various buttons.

Journaling was added in the lower right of my page.

I added three tiny buttons on the right of the photo.
 
Another great find in my stash.  I added brads to each corner which serves as the title. The edges were distressed and I used a watercolor pencil to trace over the letters so they showed up better.

This old ribbon was stained a bit, so to "cover" those, I used distress stain over the ribbon and misted it.

The background papers were also misted.


Thanks for taking a peek at my Blog.
Hope you'll stop by again!

Family

Hi there,

Well, my Dentist fixed my tooth today.  I got a chipped tooth yesterday... just out of the blue... a portion of my tooth just broke off!  I went into total panic mode (which is my normal thing)!  I was so glad they were able to get me in that quickly (thank you to the person who canceled their appointment... which enabled me to get right in)!!  :)

Enough babbling... I have a layout to share that was submitted at Colorful Creations for their March Plus Challenge (MARPLUS).  Here's the sketch:

The challenge is to use the Sketch and Doilies.

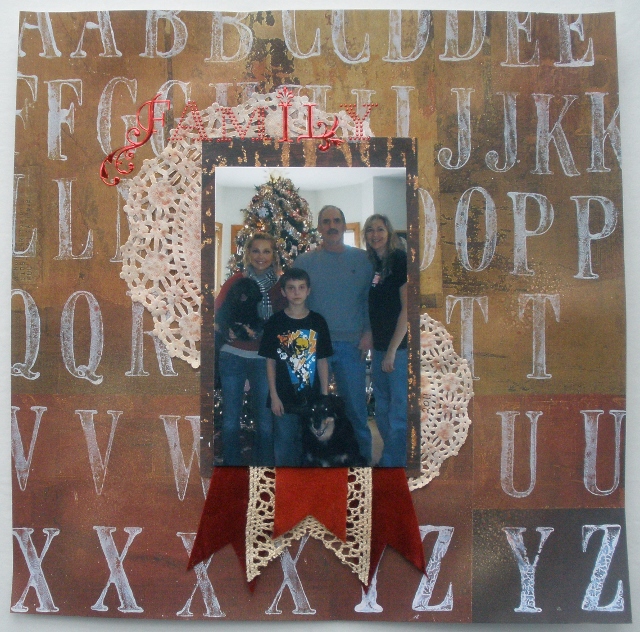
Here's what I created:
Our family photo taken in 2011.  Andrew is not in the photo because he was still in Basic Training.  Lynn is holding her dog, Max and our dog, Zoe is sitting pretty in front of Dylan.

Supplies used:
Paper: Colorbok
Doilies
Foil Embossed Stickers Title
Velvet Ribbon
Lace
Gold Color Mist: Wilton
Perfect Pearls Mist: Forever Red

Love these foil clear stickers.  They're so pretty!

 I used velvet ribbon that was recycled from a large bow and a wide strip of lace ribbon.  All were misted.

 
 You can see the misting on the right side of my page and the doily tucked under the photo.

The doily was misted with Perfect Pearls and then with the white mist.  I added the year on the doily.

 Here's a closer look at the larger doily on the left of my photo.


Thanks for stopping by.
Have a wonderful day!

Tuesday, March 5, 2013

Birthday Girl Tag

Hello all,
Hope you're all enjoying your Tuesday.

I've been working on a few layouts and a tag.  This tag was submitted at Sketches 4 All for their Same Color Mix n' Match Tag Challenge.  The challenge is to use monochromatic colors on your tag.

I've chosen to create a tag in blues.
I went digging through my scraps stash to get these paper colors (DCWV).  The base of the tag and top portion were embossed using Darice and Cuttlebug embossing folders.  Lace was added through the middle of the tag.  Satin ribbon was tucked under the flower and at the top of the tag.  Using my Sizzix leaf die, I cut some blue leaves.  The flower was in my stash.  Everything was misted with Wilton Color Mist and Perfect Pearls Mist.  Finally, I added the clear title stickers.
 
Here's a couple of photos showing you a better shot of the right and left side of my tag.


Thanks for stopping by!

Monday, March 4, 2013

Leading the Way

Hi there,

The layout for today was a submission at Soul Scrappers for their Sketch Challenge (SC62).

Here's the sketch:

And here's what I created:
 This is Andrew running with the boys at our Boy Scout meeting.  He was encouraging them to keep going and finish the run.

Supplies used:
Paper: DCWV
Magic Mesh
"Life in the Fast Lane" Sticker: Karen Foster
Road & Signs Stickers
Paper Crimper
Distressing
Washi Tape: Hand Made
Title Letter Stickers
Sharpie Marker

 I found various stickers in my stash... some were from a driver's ed sticker sheet.... which fit perfectly with my page.  I adhered the stickers onto cardstock and trimmed them.  This makes it easier for me to add them where I want on the page.

The larger circles were distressed.

Here's my road sticker.  I love this!!  Directly under the photo I added Magic Mesh to cardstock.

You can just see at the top of this photo that the strip of cardstock under my road was crimped.  I was trying to get more dimension onto my page, even though it doesn't show very well.  Then I added title stickers under the road.

Here's some of my hand made washi tape.  It has a light tint to it but you can still see the dotted cardstock under it.

I added more Magic Mesh on this circle before adding a couple more stickers.

Thanks for stopping by.
Have a wonderful day!

Sunday, March 3, 2013

Happy Birthday Card

Hi there,

I have a card to share that was submitted at Sketches 4 All for Stacy H-W's February 25th Card Challenge (SHWCARD25).  The challenge was to make a card entirely white.

This is what I created using a sketch from Splitcoast Stampers (SC77).
I've only made a few white on white cards... and they are SO FUN!  I think this one is my favorite!

I used lots of layers and embossing.  A white ribbon is along the left.  Peeking out from behind the flower is a corner flourish and the sentiment was tucked under the flower a bit.

Supplies used:
Paper: White Cardstock, Colorbok
Embossing Folders: Darice & Cuttlebug
Pearls
Flower: Hand Made
Sentiment: Inkadinkadoo
Ink: A la mode Black
White Ribbon
Sizzix Corner Flourish Sizzlit


Here's a closer look at my sweet little flower!  Love making these!  The banner was curled a bit so it would remain lifted off the card.

Hope you like my card.
Have a wonderful day!

Saturday, March 2, 2013

Costumes

Hi there,
Happy Saturday to you all!

Well, I made it to Week 9 for the Colorful Creations "So You Think You Can Scrap" Challenge (SYTYCS09).  Woo hoo!!

So the challenge this time was a bit harder.  It took me a couple of days to think of something.  Every time I sat in my craft room ready to work on it... nothing came to me.  I had to do what I usually do and leave it for awhile.  In the back of my mind I was always thinking about it though.  Finally, today... something came to me!  Yay!

Here's the sketch we had to use:
http://api.ning.com/files/CkX1bo9MZu70VqpbwvI1KFD4lsXukLlkTdMSeSsJmCFOOOx398Z7sBFLqfynvpFDiH4QkGj3iNk8eQvdqlln46IZaXI1TPCD/SYTYCS9.jpg

PLUS:  Use 6 photos and a 1 word title.

And you MUST use the following requirements on your layout also:

2 Different Stamps
1 Pin
2 Recycled Elements
1 Hand Made Element
 1 Rub on

Here's what I created:
Using various photos from our "dressing up for Halloween" days, this is my creation.  Each year we all dressed up.  I went to work like this and when I got home we would all dress up and go "out on the town."  It was such a fun time.

I used all the requirements:
1.  Sketch
2.  6 photos
3.  1 word title: "Costumes"
4.  2 different stamps: SU Best Blossoms (Leaves) & SU Great Friend (Butterfly)
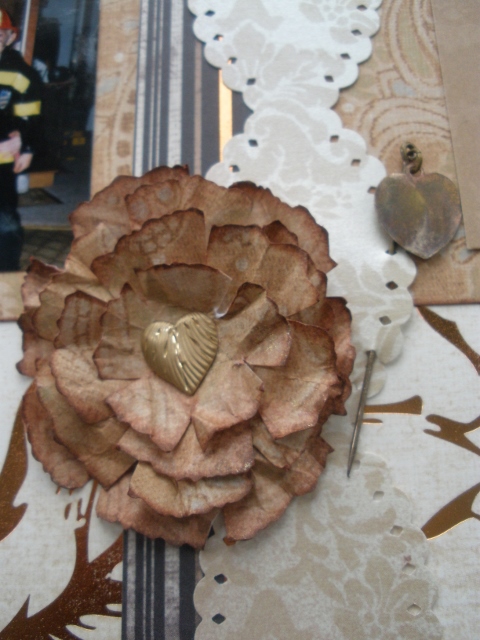
5.  1 Pin: I used a stick pin located by the flower
6.  2 recycled items:  A watch face on the right of the photo block and the gold heart in the flower center is an old earring
7.  1 rub on: Upper right of my page
8.  1 hand made element: I made a layered paper flower.

Here's the list of other supplies used:
Paper: DCWV
Sticker Letters
Ink: Vivid! Brown
EK Success Border Punch
Perfect Pearls Mist: Heirloom Gold
Gold Embossing Powder
Label Stencil: Paper Pizazz
Sharpie Marker

The rub on is American Crafts.  Love the detail in it.
 
I went digging in my stash once again and found this watch face with the backing still on it, so I just adhered it to the page as is.
 
 I added the stickers to my scrap paper, then used the label stencil to trace around it and inked the edges.

The journaling is a bit harder to read... here's what it says:

Halloween at our house was always a fun time dressing in various costumes each year.  Lynn, Andrew and I
 
Here's my hand made element which is a layered patterned paper flower.  I used decorative scissors to randomly cut different size circles, snipped some slits in each layer, inked the edges, misted them and scrunched them up before layering them.

One of my recycled items is this flower center which is an old earring.  I snipped off the back attachments and adhered it to the flower.  Cool, huh?
    
 I used a border punch along both sides of this strip of paper and using the holes already created, I put the stick pin through a couple of the holes.

The stick pin is another great find from my jewelry box.  It's something that was never used and was buried deep in the bottom.... but I found it... and it's perfect for my page!


Here's a look at the punched border.
 
 Using the Stampin' Up! Best Blossoms set, I stamped the leaves and embossed them with gold embossing powder.

 
This stamp is from the Stampin' Up! Great Friend set.  Love this butterfly, which was also embossed with the gold.
These are my two different stamps requirements.

Thanks for stopping by!